Wednesday, September 14, 2016

Crochet C2C Hello Kitty Cushion


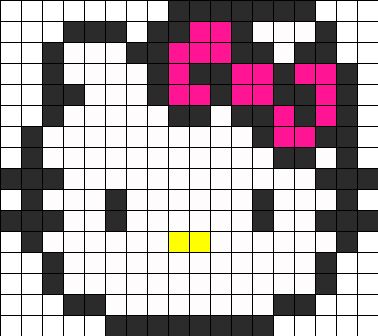
While searching on Pinterest, I came across with this Perler Bead Pattern by Kandi, and found this cute Hello Kitty picture graph. And I decided to make a cushion out of it using c2c crochet.
16 rows down and 18 rows horizontal.

The size of my cushion are 15inch width and 13 inch length.


                                         You can search some other pins in my Pinterest.


The  materials I used, 5mm hook, 8ply knitting yarn ( brand name) with my  choice of colours
Pink, black, yellow, white and purple for the edging and the back. Stuffing from my old pillow :)


 For my weaving, I choose the front and put all excess yarn to the back of your cushion using yarn needle and work from there, I just tied it up and cut the yarn.


For the back, using purple colour, I made another c2c same size as the front and I sew it together using sc stitch.


For the edging I used shell pattern

In the end of sewing the cushion,

Ch1, count as sc, *skip 1sc, 4dc next st., skip next st., ss to the next stitch, repeat * all around. Fasten off and you're Done!

Hope you all like it, If you do, I want to see your creations of c2c also :)

Happy Hooking!!!

Milina


Crochet c2c Ideas and Inspiration

After I taught myself on how to crochet c2c or crochet corner to corner, I found myself making it so often now, so easy to learn and most of all you will enjoy it.

Here is a guide and inspiration to you all, I will posted link on my finished c2c.

Here is a link from 1doogwoof on how to crochet c2c
http://www.1dogwoof.com/learn-c2c-crochet/

 My first c2c done is one of the Zoodiacs of 1dogwoof, I love how it turned out and not bad for the first time :)
You can find all her collections here

The second c2c I made is for my son as he likes bird, 
found the picture graph on Pinterest 
 and I have heaps save and pin if you want to check it out 

There's a lot ways to learn c2c and if you do, you will not stop yourself doing it :)

I hope you find it helpful

Thank you for visiting


MILINA
 

Monday, September 5, 2016

Crochet tablet/Ipad sling bag2


Another crochet Tablet/Ipad with sling done and dusted.


A massive thank you to everyone who downloaded my first crochet tablet/Ipad sling bag.

For this bag, I used shell stitch, love how it turned out, looks like a star stitch to me :)

This is for 7inch tablet/Ipad but you can make it bigger, by adding chain.

I did test it on two different devices, the light and a little bit heavy but all good. 
Can be use as purse or handbag as well.


For the shell pattern, 
which is the body of the bag

All you need are:
Your choice of yarn
I used a yarn name called knitting yarn 
100% acrylic but soft 8 ply

4.5mm hook for sewing the sides
5mm hook
scissor
yarn needle
all in US term
button

 Using 5mm hook, 
make a number of chain multiple by 6 plus 4 extra turning

Chain 36 plus 4


Row 1:   
Work 2dc into 4th chain from hook, 
*skip 2sts, 1sc into next chain, skip 2 sts, 
5dc next chain, repeat from* to the end.
after sc, with the remaining 3sts, skip 2sts
3dc into last chain. turn 


Row 2:            
 Ch1 to count as first sc, 
*skip 2sts, 5dc into sc,
         skip 2 sts, sc to the next chain (3rd st in shell part),
repeat from* to end. 
Work  sc into 3rd chain of chain 3.Turn


Row 3:             
 Ch3 to count as first dc, 2dc same st. 
*1sc into the 3rd dc of 5dc (shell part) skip 2 sts,
5dc next sc, repeat from* to end,
after the sc into the 3rd dc of 5dc (shell part) skip 2 sts, 
work 3dc into last sc. 


Repeat from row 2 until you have 32 rows or if you happy with your length.

 
Measure to your tablet or Ipad and fold, 
make sure your row 32 will be your front
place a  marker  and start sewing both sides 
by using 4.5mm hook.

Just a note when sew both sides, 
work 1sc in sc space and 2sc in ch3 space.
Fasten off and weave ends.

For the strap:
ch150 or more,
ch1 and work hdc across
sew to the bag and sew the button too
and you're Done!


If you find some errors or if you have a question 
please let me know.
You can sell your finished product and  
you are all welcome to post it in my facebook page.
Thank you for visiting

If you would like a PDF copy please visit my Ravelry Store

Enjoy!!

MILINA